Bandicam is one of the most popular screen recording tools for Windows. Whether you’re recording a tutorial, gameplay, online class, or a business presentation, Bandicam allows you to capture high-resolution video with minimal lag and excellent performance.
But to get the best quality possible, you need the right settings and some pro tips. In this guide, we’ll show you exactly how to set up Bandicam for smooth, high-quality screen recording.
🎬 Step 1: Install Bandicam
You can download the latest version of Bandicam from the official website:
👉 https://www.bandicam.com
The free version allows up to 10 minutes per video with a watermark. If you need unlimited recording without watermarks, consider upgrading to the paid version.
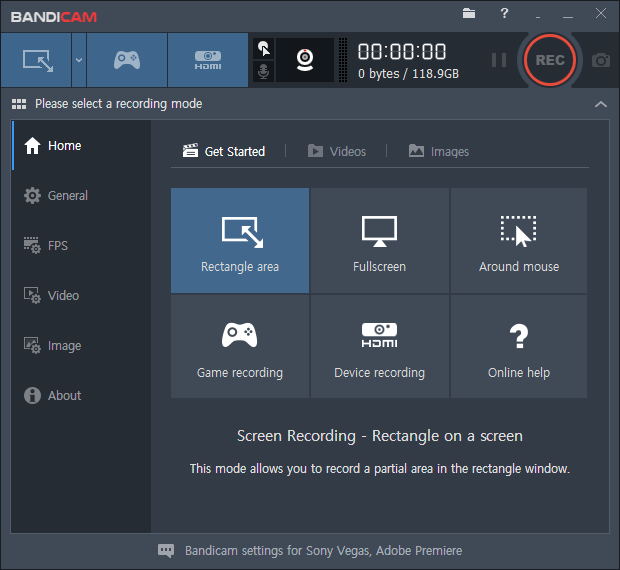
⚙️ Step 2: Choose the Right Recording Mode
Bandicam offers three main recording modes:
-
Screen Recording Mode – record any area of your desktop
-
Game Recording Mode – optimized for DirectX/OpenGL/Vulkan games
-
Device Recording Mode – capture from webcams, consoles, or HDMI devices
👉 For tutorials or presentations, choose Screen Recording
👉 For gaming videos, use Game Recording for better performance
🛠️ Step 3: Optimize Video Settings for HD Recording
Go to Settings → Video → Format Settings, and apply the following for high-quality output:
🔧 Recommended Settings for HD (1080p) at 60FPS:
| Option | Value |
|---|---|
| File Type | MP4 (or AVI if preferred) |
| Video Size | Full Size (1920×1080) |
| FPS | 60 |
| Codec | H.264 (CPU) or H.264 (NVIDIA NVENC/AMD VCE) |
| Quality | 80%–100% |
| Audio Codec | AAC 48kHz stereo |
✅ Tip: If you have a modern graphics card (NVIDIA or AMD), enable hardware acceleration via NVENC or VCE – this reduces CPU load and ensures smoother recording.
🔊 Step 4: Configure Audio Settings

Make sure you’re recording both system sound and microphone input:
-
Go to Settings → Audio
-
Primary Sound Device: Default Output Device
-
Secondary Sound Device: Your Microphone
✅ Use a USB microphone like Blue Yeti Nano for clear voiceover narration
📼 Step 5: Start Recording
-
Click the red REC button or press F12 (default hotkey)
-
A timer will appear showing the recording duration
-
Click Stop or press F12 again to finish
Your video will be saved to:
📁 C:\Users\YourName\Documents\Bandicam
✨ Pro Tips for Better Recording
✅ 1. Use “Windows Game Mode”
Before launching a game, activate Game Mode in Windows settings to allocate more system resources to Bandicam.
✅ 2. Clean Your Desktop
If you’re recording a tutorial, close unused apps, turn off notifications, and organize your desktop for a cleaner look.
✅ 3. Record in Segments
For long videos, record in shorter segments (5–10 minutes each) and stitch them together using a video editor like Shotcut or DaVinci Resolve.
✅ 4. Enable Mouse Effects (Optional)
Under Settings → Video → Mouse, enable cursor effects to highlight clicks — useful for educational content.
🎧 Recommended Equipment for Best Results
Want pro-level quality? Combine Bandicam with these tools:
📦 Bonus: Free Alternatives to Bandicam
If you’re looking for free, watermark-free alternatives, check out:
-
OBS Studio – Free & open-source, great for advanced users
-
ShareX – Lightweight, open-source with lots of capture options
-
Xbox Game Bar – Built into Windows 10/11 for basic screen recording
Explore more in our Free Screen Recorder Comparison Guide »
✅ Conclusion
Bandicam is a powerful and lightweight screen recorder perfect for beginners and advanced users alike. With the right settings and equipment, you can record 1080p or even 4K videos smoothly and professionally.
🎯 Need safe downloads and more free tools?
Visit our Download Center on TLBox.com for verified, bloat-free software recommendations.